Category Archives: Articles

Spy in the sky – the Photographic Reconnaissance Unit in the Second World War

Today we have satellites travelling in orbit around the earth which can take incredibly detailed photographs of what is happening on the ground below, an invaluable aid to intelligence agencies everywhere. Surprisingly, Britain also had its own sophisticated ‘spy in the sky’ during the Second World War. Blue painted Spitfires armed with cameras instead of guns took tens of millions of aerial photos over enemy territory, ten million of which survive today and are stored in archives in Edinburgh.

Spitfire mk11
Danesfield House

The centre for this reconnaissance was RAF Medmenham based at Danesfield House 60 miles west of London, a Base rivalling the code-breaking Bletchley Park in its secrecy; and it was here that one of the most important stories of the war unfolded. With the clever use of a simple stereoscope the workers at Medmenham were able to scrutinise the spy photographs and bring every building and fold in the land to life in 3D. This enabled them to measure the height and width of objects and so gave a more accurate picture of their targets. Operatives at the Base assessed railways, factories, shipyards, and buildings; and they were always on the lookout for something ‘unidentified’, searching for anything unusual which might have a bearing on the course of the war.

The Photo Interpreters (PI’s) at Danesfield House were tasked with providing up to date and incredibly accurate information about the movements of the German war machine – during the war 80% of Britain’s intelligence came from photo reconnaissance and interpretation. The most important example of the work done at RAF Medmenham was Operation Crossbow which identified and hunted down something which had never been seem before – Hitler’s mysterious ‘V-weapons’, the new pilotless drones and rockets which could potentially have led to Germany finally winning the war.

Air reconnaissance really ‘took off’ in 1940 when the RAF created a special wing – the Photographic Reconnaissance Unit, and the secret of its success was its adapted Spitfires. These planes were painted a pale blue to be camouflaged against the sky at 30,000 feet, which was the perfect height for taking the photographs. The guns on the reconnaissance Spitfires were replaced by cameras but pilots didn’t worry about this as they had a cruising speed of 365 miles an hour and knew that no German plane would be able to catch them for most of the war, not until the Germans produced their jets in 1944 were the Spitfires in any real danger of pursuit. The planes from RAF Medmenham, flown by both British and American pilots, were able to cover great distances which allowed them to reach Berlin, they even photographed the entire Ruhr in a single mission. These pilots were incredibly skilled in flying alone, navigating to their target where they had to fly a straight and level course to prevent distortion of the photographs which were taken of targets out of sight directly beneath them. To achieve this they would roll the plane on their initial pass above the target to identify the key features, and then come in for a second pass when they took the pictures. Each plane had five very large cameras which were able to identify and photograph something as small as a man on a bicycle from 30,000 feet. To ensure the best quality images the cameras had to be heated at altitude whilst the pilots in their cockpits were left to endure the freezing cold for 5 hours at a time. Once the planes arrived back at base the PI’s took over.

The analysis of the aerial spy photos was three-phased. Stage 1 – as soon as the plane landed the films were developed and the negatives viewed. If something needed acting on immediately (say within about 24 hours) for example shelling or bombing a bridge where German troops were crossing, these would be given priority. Stage 2 – the photos were then developed; it seems almost impossible to believe, but 36 million prints were made during the war. The priority pictures were dealt with and the rest sent to Medmenham where the PI’s identified any targets which would need to be dealt with during the next week. Stage 3 – items which were more long term, factories or dams for example, were dealt with last.

Scrutinising and interpreting the photographs was not an easy task and PI’s were often recruited from professions where people were used to working precisely and in detail – many mathematicians, geologists and archaeologists were recruited from Oxford and Cambridge universities. As well as these skills a PI needed to think laterally and creatively and so staff were recruited from Hollywood with their artists eye for detail, some actors were also employed at Danesfield House, including Dirk Bogart. Around 150 women worked with the men as PI’s, helping to both identify targets and assess the damage inflicted in bombing raids to see if they had been successful or if the RAF needed to go back again.

Other countries had their own ‘spy planes’, but what made Medmenham unique was the way that they processed the information by taking ordinary 2D photos which had been shot in an overlapping sequence and looking at them through a stereoscope to create a 3D image. The pictures overlapped each other by 60% to give a very detailed image which the PI’s became experts at interpreting. It was this expertise which identified something strange in May 1942. A reconnaissance Spitfire pilot had seen something unusual at Peenemunde on the Baltic coast where he photographed a new airfield which had three large concrete and earth circles beside it. A great deal of attention was paid to the photographs, but no one could identify what the circles were, and after concluding that they might possible have something to do with sewage the pictures were shelved.

The story of Medmenham and Peenemunde might have ended there if it had not been for a curious incident in March 1943 when two German generals who had been captured in North Africa were bugged talking at Trent Park Military Prison. They were discussing a new secret weapon, a rocket which would soon be targeting England and would probably change the course of the war. On 23rd June 1943 the RAF spy planes were sent out to scour Germany and northern France to see if they could find any evidence of these weapons. Hundreds of photos were analysed by the PI’s who were told to look for tubes which could fire missiles at Britain from France – a daunting job when no one at that time had any idea what a missile site might look like. One keen-eyed PI spotted a tube on its side in one of the strange circles at Peenemunde, and with this knowledge they went back over previous photos and found a picture of one of the rockets in an upright position; thanks to their 3D technology they were able to work out the height of the object from its shadow – an impressive 14m.

Peenemunde

Churchill’s chief scientific advisor Lord Cherwell refused to believe that Hitler had the technology to build such weapons so Medmenham needed to get more detailed information than could be seen from their simple 3D stereoscopes, what the needed was a Wild photogrammetric survey machine used for land surveys to get the detail needed to convince Cherwell. The problem was that the Wild machines were only available from Switzerland (a neutral country). Squadron Leader Ramsey Matthews arranged for a Swedish intermediary to buy two Wild A6 machines which were then shipped through Germany to Sweden before being flown to England. It was now possible to use the machines to analyse photos and get a greater understanding of Peenemunde, measuring the rockets and test sites with incredible accuracy so that scale models could be built, models which were convincing enough to persuade Cherwell that Hitler did indeed have a secret weapon.

Wild A6

Spy planes were sent out again and brought back more alarming photos from St Pol in northern France where they had found huge concrete bunkers and had no idea what they were for. Photos from 30,000ft didn’t help so pilots were sent in at just 30m high to get detailed close-up images; PI’s correctly identified these massive concrete structures as rocket launch sites. If Hitler was to be thwarted something needed to be done, and fast.

Aftermath of the Peenemunde raid

On 17th and 18th August 1943 more than 500 bombers set off from Britain to destroy Peenemunde. The raid did very severe damage putting back the missile programme by 8-12 weeks, but more importantly some of Germany’s most important rocket scientists were killed in the raid. The missile sites in northern France were then bombed as well even though the huge thick concrete domes were effectively bomb proof. The only bomb that could touch them was the 12,000lb Tall Boy and the even bigger Grand Slam bombs designed by Barnes Wallis. The bombs created a mini-earthquake which caused the huge domes to shift on their foundations (although not destroy them) effectively putting the sites out of action.

La Coupole at Helfaut-Wizernes

After the air-raids Hitler moved his V-weapons programme deep into Germany and Poland so that it could not be hit by the Allies again, so Medmenham turned its focus to finding launch sites in northern France – the ramps for the VI’s hidden in woodland were difficult to spot but, with perseverance, 96 sites were eventually identified by the PI’s, and on 1st December 1943 a V1 rocket was identified on a ramp for the first time. This was one more piece to the puzzle and the Photo Interpreters looked back at the 96 sites in northern France and were able to correctly identify them as V1 storerooms and launch sites aimed at Southampton, Portsmouth, and London. More importantly, VI’s fired from these sites would also be able to reach the proposed beachheads for the Allied invasion of Europe, for D Day to be successful the launch-sites would have to be wiped out before any invasion force set out – Operation Crossbow was planned to bomb the V1 sites, beginning on 23rd December 1943.

V-1 ready for launch

From early 1944 Medmenham was given a second focus – to help invasion planning by monitoring German activity in northern Europe, and every platoon commander on D Day had maps of minefields and defences in the area he was attacking, all supplied by RAF Medmenham. When the first V1’s began to land on London just days after D Day in June 1944 the PI’s again put all of their energies into looking for the launch-sites which had been moved from the woodlands and were now even more cleverly concealed in factories and amongst buildings. As the Allied invasion forces advanced they overran the V1 emplacements, and the last doodlebug fell on London 7th September 1944. One day later the first V2 travelled from mainland Europe at supersonic speed, coming out of nowhere with no warning to crash into Chiswick in London with devastating consequences. There was no defence against the new threat as V2 launch sites were mobile and so difficult to spot in time. Thankfully the Allied forces had already advanced to a point where the launch sites were soon pushed back out of range of England.

In a few short months Hitler’s V-weapons killed about 9,000 people in England, who knows how many more would have died and how much longer the war would have gone on if not for the work of the air reconnaissance at RAF Medmenham. And Operation Crossbow.

ROYAL AIR FORCE: CENTRAL INTERPRETATION UNIT © IWM (CH 16105)/ ALLIED CENTRAL INTERPRETATION UNIT, 1941-1945. (CH 16105) Flight Lieutenant H H Williams demonstrates the Wild A5 ‘Stereo-autograph’ plotting machine to press visitors at Medmenham, Buckinghamshire. A vital piece of photogrammetric equipment, the Wild A5 produced accurate maps from stereoscopic pairs of photographs, and was in constant use at the CIU and ACIU throughout the war. Copyright: © IWM. Original Source: http://www.iwm.org.uk/collections/item/object/205196665

‘Britain’s Baby Blitz’ – the world’s first jet propelled missiles

It was 75 years ago today that the world awoke to a new age as the first V1 rocket fell on the city of London.

We are all used to the term ‘Weapons of Mass Destruction’, and prior to the Second World War the only weapon which could have been called that was the gas used in the trenches during the First World War. The shells used to deliver the gas were of a conventional nature, but what the Germans later developed was something completely different so that when Hitler’s new weapons rained down on London for the first time in 1944 they were almost incomprehensible in their sophistication and power. What were they? And where did they come from?

In 1939 the Oslo Report alerted London to the development of new and very advanced weapons in Germany, but the report wasn’t taken seriously – if Britain couldn’t build such weapons then obviously Germany would be incapable of it too – and it was a number of years before the threat of missile weapons aimed at Britain from the continent was recognised by the Allied powers. It was on 29th September 1943 that Albert Speer publicly promised retribution against the mass bombing of German cities, saying that the Nazis now had a new ‘secret weapon’; Hitler intended to deploy thousands of these weapons, and if he had succeeded he would almost certainly have destroyed the city of London.

Wernher von Braun at Peenemunde Army Research Centre

Research and development of the ‘secret weapon’ was carried out in a purpose-built facility at Peenemunde on the Baltic coast, which was the biggest research centre in the world between 1936 and 1945 and the first ever missile test site. With brilliant scientists like Wernher von Braun Germany was way ahead of the Allies in missile technology, and by 1942 they were making good progress with the test launch of the first V1 missile. Then, on 3rd October 1942, the Germans launched the first V2 rocket into the stratosphere at supersonic speed, changing the face of warfare for ever. The ‘V’ in their name stood for Vergeltungswaffen meaning‚ ‘revenge weapon‘, and Hitler hoped that they would be in place in time to punish Britain for the destruction of German cites and turn the tide of the war in his favour.

V2 launch Peenemunde

Allied spy planes had already identified Peenemunde as a key site in Hitler’s weapons development programme, and on 17th and 18th August 1943 more than 500 bombers set off from Britain to destroy the facility. The raid was very successful, causing severe damage at the site and putting back the missile programme by 8-12 weeks, but more importantly from the Allied point of view some of the most important scientists involved in the project were killed during the raid, a loss which could not be replaced. As well as Peenemunde, the Allied spy planes had also identified a huge concrete bunker at St Pol in northern France, and an even bigger one in a quarry at Wizernes, 40km from the English Channel. They were not sure what these structures were for but knew that they must be vitally important to the Germans (they were actually intended launch sites for the V-weapons). These missile sites in northern France were bombed following the raid on Peenemunde, and although the huge thick concrete domes were effectively bomb proof the foundations were damaged by ‘near misses’ which made some of the sites inoperable. The only bomb that could touch the massive concrete structures was the 12,000lb ‘Tall Boy’ and the even bigger ‘Grand Slam’ bombs designed by Barnes Wallis, the mastermind behind the ‘Bouncing Bomb’.

Nordhaousen V2 faclity © IWM (OWIL 64335)

The Germans could not afford the losses caused by the Allied bombings and so the V-weapons programme was relocated to the forests of Blizna in Poland and the Hertz mountains of Germany. A mountainside just outside the small town of Nordhausen was turned into an underground factory to make V-weapons, the tunnels were so long and deep that it was hard for the allies to bomb them, and impossible for them to know what was happening inside. The SS were put in charge of the V-weapons programme at this critical stage and they conscripted 60,000 slave labourers to work there, housing them in the concentration camp at Dora. The tunnels stretched for 21km, and the conditions for the workers were terrible. Until the spring of 1944, prisoners were mostly kept underground in unstable tunnels, deprived of daylight and fresh air. The mortality rate was higher than at most other concentration camps with prisoners who were too weak or ill to work were sent to Auschwitz-Birkenau or Mauthausen camps to be killed. In 1944, a compound to house forced laborers was finally built above ground level south of the main factory area, giving the workers some relief from the atrocious conditions underground. Once full production of the missiles began towards the end of 1944, the Dora-Mittelbau concentration/work camp had a prisoner population of at least 12,000.

As the final elements of the V-weapons were put together work went ahead to create launch sites in northern France with many hidden ramps being created in woods. These were V1 storerooms and launch sites aimed at Southampton, Portsmouth and London; the Germans planned to use these sites to launch up to 2,000 V1’s every day.

V1 ready for launch

The V1 was a small pilotless winged bomb which carried 1 ton of high explosives and was powered by a jet engine which enabled it to travel at a maximum speed of 400 mph with a maximum reach of 200 miles (this distance decreased in poor weather conditions). A pre-set magnetic compass together with a gyroscopic auto-pilot helped it to find and maintain its course, while at the front of the flying bomb was a small propeller which measured the distance covered and shut the power to the engine when the pre-set distance had been reached, hopefully over its target. The first V1 landed on London on 13th June 1944, a week after the D Day landings. After 15th June around 100 V1’s were being launched against Britain every day, and the ‘Doodlebug’ or ‘Buzzbomb’ as they were called (named after the sinister sound they made) brought terror to the streets of London. When the sound of its engine stopped people ran for cover as the flying bomb fell from the sky. This new terror became known as ‘Britain’s Baby Blitz’.

Rescue after the first V1 13th June 1944 © IWM (HU 44273)
40mm Bofors anti-aircraft gun watching for V1 rockets © IWM (H 39407)

Thousands were killed in the V1 attacks and the British fought back with everything they could. There were massed anti-aircraft guns on the south-east coast of England, and RAF pilots would either shoot down or tip over the flying bombs to force them off course. V1’s flew straight and level so they were relatively easy to take out once sighted and many were shot down before they reached their target. Of the estimated 8,000 or 9,000 launched anti-aircraft guns shot down over 1,800, a similar number were brought down by the RAF, and 200 were destroyed by barrage balloons. The greatest single loss of life caused by a V1 killed 121 people when a flying bomb landed on the Guards Chapel at Wellington Barracks during a service.

D Day had started just days before the launch of the first V1, and as the Allies advanced through northern Europe they soon overran the V1 emplacements in northern France and Holland. The launch sites were steadily pushed further and further back until England was no longer within their reach and the last doodlebug fell on London 7th September 1944.

V2 labelled nach England, to England © IWM (BU 3238)

The Baby Blitz was not, however, over. The following day, 8th September 1944, the first V2 crashed into Chiswick in London with devastating effect. At 14m high it was a streamlined rocket as tall as a four-storey building. Its engine burned a mix of liquid oxygen and alcohol-water, and it was the first missile to reach the edge of space before falling at supersonic speed, ensuring that it came out of nowhere with no warning, delivering its payload of 1 ton of high explosive at a terminal speed of 2,386 mph. The first V2 took an estimated 5 minutes to fly the 200 miles from its launch site in the Hague to London, and there was no defence against it. As the V2 explosions came without warning, the government initially attempted to conceal their cause by blaming them on defective gas pipes which had been damaged by earlier bombing. But as more and more of the missiles landed on London the public were not fooled and soon began referring to the V-2s as “flying gas pipes”.

V2 damage 8th September 1944 © IWM (HU 88803)

By October the offensive was relentless. A particularly devastating strike was on 25 November 1944 when a V-2 exploded at the Woolworth’s store in New Cross Road, killing 168 people and seriously injuring 121 more. It was difficult for Military Intelligence and the RAF to take out these missiles at source as launch sites were not fixed. The Germans would pour an innocent looking concrete slab then, just before launch a truck would arrive with the rocket, set up, fuel it, launch it and drive off. The continued Allied advance through Europe allowed them to overrun these sites, and this is what saved London with the last V2 falling on the city on 27th March 1945. The final death toll of Hitler’s Vergeltungswaffen project was discovered when Dora camp was liberated and thousands of dead slave workers were found stacked outside the underground tunnels, the SS had not even bothered to bury them.

Liberation of Dora, a surviving prisoner lying amongst the corpses

Germany’s V-weapons caused over 30,000 casualties in England (9,000 deaths, the rest wounded) and left hundreds of thousands homeless. Yet despite this, the overall destruction they caused was less than the Blitz of 1940-1941. In fact, more slave labourers died making the V-weapons (an estimated 20,000) than civilians were killed during the offensive.

But the successful creation of the V-weapons had ushered in a new type of warfare. The Americans and Russians rushed to grab this new technology and the scientists who had created it with Werner von Braun eventually going on to be one of the lead scientists on the American Saturn 5 project which took man to the moon.

Jim Radford ‘The Shores Of Normandy’

Jim Radford

Thursday 6th June marks 75 years since the Allies invade northern Europe on the beaches of Normandy. The largest seaborne invasion in history was supported by the Mulberry Harbours, and the most moving memorial to those who built the harbours and stormed the beaches is made by Jim Radford, who was just a boy sailor aged 15 when he sailed to Normandy.

Jim has written a song about his experiences; it has been re-recorded for this anniversary and is racing up the charts towards number one.

Please take the time to read this article, and to listen to him singing of the day this boy became a man. I can think of no more fitting tribute to those who gave so much on 6th June 1944. https://www.heart.co.uk/news/who-is-d-day-veteran-jim-radford-and-whats-his-son/

Cavalry, tanks, and a German propaganda coup

The cavalry charge at Krojanty on the first day of the Second World War is widely described as the last cavalry charge in modern warfare. The story goes that the Poles came across advancing German tanks and bravely charged them, pennants flying, sun shining on their swords and lances; an out of date and backward country taking on the mechanical might of a modern army. In The Rise and Fall of the Third Reich William L Shirer even described the charge as ‘Horses against tanks! The cavalryman’s long lance against the tank’s long canon! Brave and valiant and foolhardy though they were, the Poles were simply overwhelmed by the German onslaught’; it is an evocative image of the Polish upper class, a well-educated fighting elite, sacrificing themselves in the defence of their homeland against Nazi Germany to the west and the Soviet Union to the east. But is it really true?

charge-savoia-cavaleria
The Italian Savoia Cavalleria at Isbuscenskij, August, 24, 1942, one of the last cavalry charges of WW2

Many may be surprised to know that horses, which had always played an important role in warfare, continued to do so during the Second World War. The German Army still had around 500,000 in 1939, and almost 2.7 million in service by the end of the war; in two months during the winter of 1941-2 179,000 horses died of exhaustion and cold on the Eastern Front. The majority of these horses were used for logistical purposes, but cavalry had not disappeared altogether. Some cavalry units still used lances and sabres, but most were now mounted infantry able to get quickly from one place to another where they would dismount to use more modern weapons such as machine guns, anti-tank rifles, and mortars. There were cavalry units attached to a number of armies – the French, British (particularly the Sikh sowars who led the last British sabre charge of the war on the Burma Frontier), Americans, Hungarians, Russians, Rumanians, and Italians, as well as the Germans and Poles.

In 1939 Poland had 11 cavalry brigades which made up 10% of the army and were intended to be used as mobile reserves, and far from Krojanty being the last cavalry charge there were at least 14 such engagements by the Poles during the first month of the war,* most of them successful. So why is the Krojanty charge so famous and so misrepresented?

Polish Uhlan with anti-tank rifle 1938
Eugeniusz_Swiesciak
Eugeniusz Swiesciak

The action, which was part of the wider Battle of Tuchola Forest, took place near the village of Krojanty on the evening of 1st September 1939. A group of German infantry were resting in the forest and Colonel Kazimierz Mastalerz (who had fought in the cavalry during the First World War and knew from experience that the element of surprise would be vital in any attack) ordered Commander Eugeniusz Świeściak of the Pomeranian Uhlans to initiate a charge in one of the very first engagements of the Second World War. The Germans were unprepared and taken completely by surprise, quickly retreating before the Polish cavalry. But the attacker’s upper-hand was short lived as German armoured reconnaissance vehicles deployed from the forest road and opened fire; as the horsemen retreated Świeściak and a third of his 250 men were killed, Colonel Mastalerz was killed trying to save them. The charge had been successful though in that it slowed the German advance and allowed other units of the Polish army to make an orderly retreat in front of the advancing Germans.

Hitler youth magazine
Hitler Youth magazine perpetuating the story

The following day a number of German and Italian reporters visited the battlefield where tanks had now arrived and were deployed near the dead Polish cavalrymen and their mounts. An Italian Journalist named Indro Montanelli jumped to conclusions and sent a report saying that the Poles had been cut down whilst attacking the German tanks. It would have been easy enough for the Germans to deny this, but they quickly saw the propaganda value of the story and ran an article in Die Wehrmacht, a propaganda magazine in Germany, implying that the charge demonstrated how strong and sophisticated the new German army was and how weak and ill-prepared were her enemies. At the end of the war the story was reinforced by the Soviets to show how the poor Polish peasants had been failed by a decadent aristocratic class. As Germany and Italy had the only reporters to visit the site this propaganda myth continued to be perpetuated even up to the 1990’s.

There seems to have been only one instance of the Polish cavalry charging German tanks, and this happened entirely by accident at Mokra. In the middle of the confusion and smoke of battle Captain Hollak suddenly found himself and his unit riding directly at the flank of a German column, with little choice and before the enemy had time to react he led his men at the gallop through the German tanks and seized the high ground. Two days later Mokra was lost to the advancing Germans.

OLYMPUS DIGITAL CAMERA
The monument to the Wołyńska Cavalry Brigade at Mokra

There were a number of other small cavalry charges in different theatres of the war during World War 2 whilst Zimbabwe (then Rhodesia) and Mozambique used cavalry into the 1970’s; the Americans used horses in Afghanistan during Operation Enduring Freedom in 2001, and the 61st Cavalry unit is still a part of the Indian Army today.** So the importance of the horse during warfare continues, and the Charge of Krojanty rather than showing a last brave cavalry charge as the past gave way to modern warfare should probably be seen more as an enduring testimony to the power of propaganda.

**(I believe this is the only non-ceremonial cavalry unit in a modern army but would be interested if anyone can tell me otherwise).

*Polish cavalry charges during the first month of the Second World War:

  • 1st September 1939 – the battle of Krojanty
  • 1st September 1939 – against a small group of the 4th Panzer Division in Mokra
  • 1st September 1939 – Polish and German cavalry met at Janów
  • 2nd September 1939 – Polish and German cavalry met at Borowa Góra
  • 11th September 1939 – Polish cavalry attacked German infantry at Osuchowo
  • 11th – 12th September 1939 – Polish cavalry recaptured the village of Kaluszyn
  • 13th September 1939 – Polish cavalry were repelled at Mińsk Mazwiecki
  • 13th September 1939 – A second charge retook Mińsk Mazwiecki
  • 15th September 1939 – A polish charge at Brochów
  • 19th September 1939 – Polish cavalry cleared the way for the army to retreat from Wólka Weglowa
  • 21st September 1939 – A Polish charge halted a German assault at Łomianki
  • 23rd September 1939 – Polish cavalry retook Krasnobród (German cavalry was also involved)
  • 24th September 1939 – A Polish cavalry charge initially halted a soviet advance at Husynne before being stopped by tanks
  • 26th September 1939 – 2 Polish charges forced the Germans to withdraw from Morańce

How RADAR helped to win the war

It is always an advantage in battle to know what the enemy is up to. In the past the military relied on observers and spies to supply this information, but during the twentieth century technology began to play a more important role allowing the Allies to identify enemy planes, ships and submarines from a greater distance through the use of radar (Radio Detection and Ranging). Planes were first used in war for reconnaissance (1914-18) but as they became bigger and faster it became clear that planes were the weapons of the future and the threat of bombing of civilian centres grew, in 1932 Stanley Baldwin (the British Prime Minister) said that ‘the bomber will always get through’. To try to combat this scientists and technicians turned to radar.

christian-hc3bclsmeyerjpg.jpg
Christian Hülsmeyer

It was in the 19th century that Michael Faraday and James Maxwell predicted that radio waves existed. In 1886 Heinrich Hertz conducted experiments which proved this to be the case and the first primitive radar system, in which radio waves were sent out and reflections from distant objects detected, was patented by German engineer Christian Hulsmeyer in 1904. Little was done to develop this use of radio waves until the late 1930’s when the threat of war led to at least eight countries – France, Germany, Italy, Japan, Netherlands, the Soviet Union, the United Kingdom, and the United States—independently developing radar. Britain’s air-defense radar system (known as Chain Home) was in place before the Second World War actually began as the government was aware of the very real threat from the German Luftwaffe, and during the next six years of conflict scientists and engineers found dozens of ways of using the simple and yet highly adaptable radar.

Chain_home
Chain Home

A committee set up by th British government in the 1930’s to consider the problem of air defence originally come up with the idea of using electromagnetic waves to develop a ‘death ray’, thankfully Robert Watson-Watt convinced them that this was a bad idea and to concentrate on an aircraft detection system instead! He recognised the importance of being able to see planes from a distance and follow their course in overcast weather or at night. Rapid progress was made as Watson-Watt used what he called his ‘third best principle’ – the best is usually unattainable and the second best unavailable until too late – this meant that they went with the ‘third best’ option and devised a system which worked with two antennas, one for transmitting and one for receiving, as they still had to develop a single antenna to do both. By 1939 a chain of eighteen radar stations was set up to cover the south and east coast of England. Chain Home, as it was called, used fixed transmitters to send out a broad beam of radio pulses to detect planes which were approaching at 1,500 – 2,000 feet; the stations were positioned on cliffs and high ground to give them a greater detection range and they could ‘see’ planes up to 200 miles away. The system was further developed in 1940 with the introduction of a new ground-based radar which could detect low-flying aircraft and ships. This was called Chain Home Low and differed from Chain Home by using a rotating aerial to transmit a narrow beam, rather like a searchlight. It could detect aircraft flying at 500ft from 110 miles away and display the information on a circular screen similar to modern radar displays. Stations could be set up on cliff tops, but if the coastal area they were protecting was low lying the transmitter and receiver would be mounted on towers 200 feet high.

radar operator
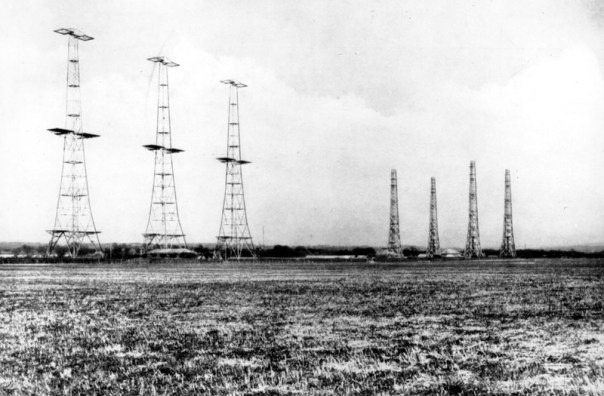
Women in the WAAF worked in these radar centres. When a signal was received from approaching aircraft it was displayed on a green cathode ray tube. This showed the pulse sent out by the transmitter moving in from the edge of the screen with the target aircraft positioned in the centre. The screen could be calibrated for anything up to 200 miles which enabled the operator to ‘zoom in’ on the approaching craft. The radar operator would move a cursor over the position of the aircraft and the information was automatically sent to a calculating machine along with further information which enabled it to work out the plane’s height as well as position. This information was then sent to the mapping room with a large table on which the planes were positioned, a visual aid which made it easier for non-technical officers to direct the defending planes.

Chain Home was a massive step forward in air defence but it did have its problems. As the stations faced out to the sea contact was lost with enemy aircraft once they crossed the coastline, and Chain Home Low could not help either as it was difficult to distinguish between planes and signals from the ground. So the Observer Corps was given the job of watching the skies with tradition means (binoculars) and plotting enemy aircraft formations. Another problem was that although Chain Home picked up signals from approaching aircraft the signals could be misinterpreted and so inaccurate information about enemy strength and height could be passed to Air Command which meant that British fighter pilots could be put in dangerous situations, but the benefits far outweighed the drawbacks as the pilots no longer needed to conduct continuous air patrols.

The first serious use of radar came during the Battle of Britain when Chain Home was able to intercept approaching German bombers and fighters. It was even possible to ‘see’ the enemy at night with Air Interception (AI) (which allowed fighter planes to fly directly towards enemy bombers at night), Ground Control Interception (GCI) and the Plan Position Indicator (PPI), all thanks to radar; it was also possible for searchlights to use radar to help target planes for the anti-aircraft guns.

proximity-fuze-diagram
Proximity fuse

There were a number of other developments in the use of radar during the Second World War:

  • Proximity fuse – a tiny radar set built into each artillery shell to trigger detonation when the shell was close to its target. By the end of the war 22 million had been produced and were particularly effective when used by anti-aircraft artillery.
  • IFF – Identification Friend or Foe, which enabled Allied planes to identify each other using radar signals.
  • H2S – an Air Interception system which could display a map of the ground below in an aircraft.
  • Gee – a system of navigation which let bombers know their exact position at any time on their journey to Germany. Without Gee the 1,000-bomber raids would never have been possible.
  • Oboe – a positioning system which allowed two bases back in England to pinpoint planes when they were directly over their target; Oboe made it possible for precision attacks on munitions factories in the Ruhr and on missile bases on the north coast of Europe.
  • ASV – a Coastal Command aircraft carrying an ASV device could use it to pinpoint a U-boat on the surface; in conjunction with a similar device on destroyers and corvettes the Allies were finally able to defeat the German submarine menace which threatened to starve Britain into submission.
Frankreich, Radargerät "Würzburg"
Wurzburg

We often forget that Germany had its own effective radar systems on their bombers during the first months of the war. They also positioned their “Würzburg” system on the north coast of France to detect approaching aircraft. So why did radar seem to be much more successful for the Allies than the enemy? This can be put down, in part, to the attitude of those in positions of power with the Battle of Britain being a prime example. On 15th August 1940, at the height of the Battle, Reichsmarschall Göering decided to halt attacks on Chain Home stations; his reasoning was that “It is doubtful whether there is any point in continuing attacks on radar sites, in view of the fact that not one of those attacked so far has been put out of action.” Unlike Göering, however, ACM Dowding recognised just how important radar was and what a benefit it would be if fully integrated into air strategy. The fact that the Germans stopped targeting the radar stations strengthened the British defence and played a critical role in the final victory of the Battle of Britain. As Sir William Douglas commented, “I think we can say that the Battle of Britain might never have been won… if it were not for the radar chain”.

radar towers.jpg

V For Victory – the sign which Churchill appropriated from the Belgians

victor de laveleyeWe have all seen photos of Winston Churchill giving his famous ‘V for Victory’ sign during the Second World War, but we actually have Belgian tennis star Victor de Laveleye to thank for this iconic sign. de Laveleye competed in the 1920 and 1924 Olympic Games for Belgium, but he was also a politician who served as Minister of Justice in 1937. As the Germans pushed west in 1940 de Laveleye fled to Britain where he was put in charge of the BBC’s broadcasts to occupied Belgium and soon became the symbol of free Belgians everywhere. On 14th January 1941 Laveleye asked all Belgians to use the letter ‘V’ as a symbol of resistance and a rallying cry to fight the invaders because, he said, ‘V is the first letter of Victoire (victory) in French and Vrijheid (freedom) in Flemish, like the Walloons and the Flemish who today walk hand in hand, two things that are consequences of each other, Victory will give you Freedom’. He went on to say that “the occupier, by seeing this sign, always the same, infinitely repeated, [will] understand that he is surrounded, encircled by an immense crowd of citizens eagerly awaiting his first moment of weakness, watching for his first failure.” The Belgian people willingly adopted the sign and the letter immediately began to appear daubed on walls in Belgium, the Netherlands, Northern France, and other parts of Europe, a symbolic act of defiance against the Nazis.

håkon_7._malt_i_veien
Resistance graffiti on a road in Norway the V sign cradeling the initials of King Haakon VII

churchill v sign
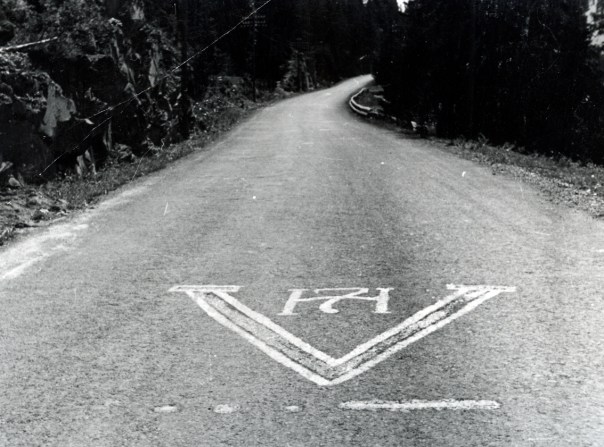
Winston Churchill realised how successful this symbol was in uniting people against Hitler’s regime and decided to use it during a speech in July 1941 when he said that ‘The V sign is the symbol of the unconquerable will of the occupied territories and a portent of the fate awaiting Nazi tyranny. So long as the people continue to refuse all collaboration with the invader it is sure that his cause will perish and that Europe will be liberated.” Churchill continued to use the sign as his ‘signature gesture’ for the remainder of the war.

Soon after Churchill’s broadcast Douglas Ritchie at the BBC noticed that the Morse code for V was three dots and a dash ( …_ ) which was the same as the rhythm for the opening of Beethoven’s Fifth Symphony, and the BBC used it in its foreign language programmes directed at occupied Europe for the rest of the war. It was not long before the rhythm was used as a symbol of defiance in Europe, one which people could tap out almost anywhere.

In Germany Goebbels, the Nazi Propaganda Minister, was infuriated by the ‘V campaign’, but there was nothing he could do to stop it. He tried to argue that because ‘V’ was the first letter of the German word ‘viktoria’ and the musical representation was from a symphony written by a German composer then it was really a symbol in support of the Nazi’s final victory and was a sign of the conquered population’s support of Hitler, but of course no one believed him. To try to bury the use of the symbol by the resistance the Germans started using the ‘V’ themselves, even the Eiffel tower had a ‘V’ with the slogan ‘Germany is Victorious on All Fronts’ underneath.

the eiffel tower during the nazi occupation, 1940
TheEeiffel Tower during the German occupation of France

churchill reverse v sign


When Churchill first used the ‘V’ sign he sometimes did it with palm facing in until it was pointed out to him that this had a rather rude meaning for the working classes; from then on Churchill made a point of holding his hand palm outwards. Of course, the sign appealed to many people precisely because of its ‘double entendre’ meaning – with a simple movement of the wrist they could indicate a belief in victory and also tell Hitler where to go!

poster


America also took the ‘V’ sign to heart and it appeared in numerous places, including on this poster from the War Production Board.


Four years after de Laveleye first urged the use of the ‘V’ sign the Allies finally achieved Victory in Europe, and months later came Victory against Japan, but by that time the iconic Second World War symbol of defiance had become so embedded in the minds of the people that it is still used today.

ve day
The ground crew of a Lancaster bomber return the ‘V for Victory’ sign projected into the sky by a neighbouring searchlight crew on VE Day.

There are some interesting pictures of the use of the ’V’ sign during the Second World War in this video

Alexander Wilson – the puzzling story of a Second World War spy

Alexander-Wilson.jpg
Alexander Wilson

Not all battles during a war are fought between armies in the open field. There have always been the men and women who work in intelligence and whose stories can often be very complex and difficult to understand, if we can unravel the truth of them at all. One such example was brought to our TV screens in December 2018 when many people in the UK were enthralled by the BBC drama ‘Mrs Wilson’ which told the story of Alexander Wilson, author, spy and bigamist. What most people found fascinating was that almost eighty years after some of the events took place we still don’t know the truth about Alexander Wilson as the government has still not released all the papers relating to his work. Who was Alexander Wilson? What role did he play in the murky world of espionage before and during the Second World War? Was he a patriot or an inveterate liar? Is it possible that a look at the situation in Egypt, and specifically Cairo, during that period may lead to some answers, or will it simply lead to more questions?

Alison Wilson
Alison Wilson

One thing that we do know about Alexander Wilson is that he was a bigamist. After serving in the First World War (with wounds which meant that he could not go on active service in World War 2) he left his first wife Gladys and son Dennis to go to India as a Professor of English Literature, and it was there that he began to write spy novels. Whilst in India he also married his second wife, Dorothy, without getting a divorce from Gladys. There is no evidence that Wilson worked for MI6 at the time, although that claim has been made by some.

When Wilson returned to England in 1933 he left Dorothy and their young son, Michael, and returned to his first wife, Gladys. About eighteen months later (in 1935) he moved to London, leaving his legitimate wife behind yet again. We do know that Wilson was working for MI6 at this time as he met his third wife, Alison, when she was his secretary there (again, no divorce); Alexander and Alison had two sons, Gordon and Nigel. In 1942 Wilson told Alison that the authorities were about to say that he had been dismissed from MI6 but it was all part of an elaborate cover story which would enable him to work as a spy in the field – specifically enabling him to get close to fascists and other targets in prison. The reason MI6 gave for his dismissal was that he had embellished a story about alleged Egyptian espionage and could not be trusted; he was also later accused of burglary and declared bankrupt.

Nahas Pasha
Nahas Pasha

The key reason for Wilsons ‘dismissal’ by MI6 was that they said his reports that the Egyptian Ambassador in London was spying for the Nazi’s were pure fabrication. Yet it was well known by the authorities at the time that a number of factions in Egypt were actively helping the Nazis in the hope that they would gain independence if Britain was defeated. And the Egyptian Ambassador in London was none other than Nahas Pasha, a key nationalist who had already plotted to overthrow the pro-British Egyptian government. To understand Wilson’s story we may need to understand more about Egypt during the Second World War.

Egypt had become part of the Ottoman Empire in 1517 but western countries, including France, German, Italy, and Britain began to have more influence in the 19th century. In the 1850’s Ferdinand de Lesseps was given permission to build the Suez Canal which was underwritten by the Egyptians who were more or less forced to give the Suez Canal Company generous concessions, so much so that Egypt had to borrow large amounts of money to keep her economy going. Egypt was soon over £100 million in debt and had to allow the British Prime Minister, Disraeli, to buy up many of their shares in the Canal. France and Britain understood the importance of the Canal for trade and took over the Egyptian economy in 1876, declaring that they would maintain this role until the debts had been paid. When influential Egyptians tried to take back more control of their country British forces moved in and the British occupation of Egypt began in 1882 with the country becoming a Protectorate in 1914 at the outbreak of the First World War. Many Egyptians felt cheated at the end of the war when the independence they thought they had been promised was not forthcoming, in fact they were not even allowed at the conference to decide the fate of their country. This led to riots in Cairo which spread throughout Egypt. Political instability continued until the Anglo-Egyptian Treaty of 1936 which required Britain to withdraw troops from all parts of Egypt except at the Suez Canal by 1949.

King Farouk
King Farouk

Nahas Pasha served as Prime Minister of Egypt before the war but was pushed out because of his nationalistic and ant-British feelings. When young King Farouk came to the throne in 1936 things changed – he wanted an end to British occupation of his country and was very friendly with the Italians. When war broke out many (but not all) Italians and Germans were interned at the insistence of the British, but Egypt refused to declare war on Germany and remained technically neutral until 1945. At the end of May 1940 Cairo was declared an ‘open city’ which meant that as the war in North Africa ebbed and flowed through the desert British troops rubbed shoulders with Italians and Germans on the streets of Egypt’s capital city. King Farouk refused to dismiss his Italian servants who kept lines of communication open with Rome, there were rumours of a powerful transmitter at the king’s Inchasse Palace, and he kept the lights burning at his palace in Alexandria despite the black-out imposed because of the Italian bombing of British facilities. It didn’t take a member of the intelligence community to see that although nominally British those in power in Egypt were firmly on the side of the Axis.

In Cairo itself there was a vocal if ineffectual contingent of Axis spies who frequented nightspots looking for information useful to Rommel, and it was believed by many that the barman at Shepheard’s Hotel (which was frequented by British  officers) was a German spy who listened in on conversations and reported back to his superiors. Hekmet, the most famous belly-dancer in the city was later arrested and accused of being a German spy. Ex-chief of staff of the Egyptian army Aziz el Masri formed a secret anti-British organisation in the Egyptian armed forces, and students held rallies in support of German advances chanting ‘press on Rommel’; at one point Anwar Sadat was imprisoned by the British for trying to get help from the Axis powers to throw the British out of Egypt and Sudan.

One of the novels written by Alexander Wilson
A novel by Alexander Wilson

It is almost impossible to separate truth from fiction when looking at Alexander Wilson so we have little hope of understanding his motives, yet nobody disputes that Wilson was a fervent patriot who clearly wanted to serve his country in any capacity. One wonders why with all of the knowledge they had of the nationalists anti-British activities in Cairo Wilson’s superiors at MI6 said that his reports on Egyptian espionage were wrong and he could not be trusted. Was this and the later accusation of burglary and declaring him bankrupt all part of an elaborate cover as Wilson claimed? Why else would MI6 continue to meet with him until his death in 1963? He said he was still working for them while they said they had him under surveillance, but if he was so disgraced and no longer had access to sensitive information why would they feel the need to keep him under surveillance for more than twenty years?

After the war, Wilson entered yet another bigamous marriage with Elizabeth although he continued to live with Alison who knew nothing of the intricacies of his private life. Everyone accepts that he was dishonest in his relationships, but that did not necessarily transfer to his work for the intelligence services. Was Alexander Wilson simply an inveterate liar or did he work under deep cover during the war and for many years after? One thing is certain, until the British government finally releases their files on Alexander Wilson we will never know the answer.

The longest five days…Operation Compass, 9th December 1940

When we think of the early months of the Second World War we often focus on the setbacks suffered by the Allies in Europe including the disastrous fall of France and the heroic rescue of the British Expeditionary Force from Dunkirk. We also think of the losses we suffered in North Africa against Rommel and his Afrika Korps; but what is often forgotten is that our first adversary in Africa was not the Germans but the Italians and, for a time, things there were very different.

Both Britain and Italy were intent on protecting their colonies in Africa. There were skirmished between the two sides but the Italian commander, Graziani, was doubtful that his largely un-mechanized force would be capable of defeating the smaller but motorised forces of the British. The first major movement of troops began on 13th September 1940 when the Italian 10th Army advanced into Egypt and the British retreated before them to shorten their long supply lines from Alexandria, finally setting up defensive positions east of Mersa Matruh. The Italians had advanced 60 miles in 3 days before facing similar supply problems and halting at Maktila where they set up 5 fortified camps whilst they waited for supplies and reinforcements (one reason that supplies were running short for the Italians was that vital supplies had been diverted from North Africa for the invasion of Yugoslavia). In their initial push into Egypt the Italians lost almost 3,000 men with another 700 taken prisoner as well as 150 vehicles being destroyed, resources which the Italians could ill afford to lose so reconsolidation was vital if they were to defeat the British.

Mersa Matruh
Mersah Matruh

General Wavell was in command of the British troops and ordered a limited operation to push the Italians back. This push was planned to last for five days although he insisted that Lieutenant-General Maitland Wilson should be ready to exploit any advantage that Operation Compass might give saying, ‘I do not entertain extravagant hopes of this operation but I do wish to make certain that if a big opportunity occurs we are prepared morally, mentally and administratively to use it to the fullest.’

map

Wavell’s plan was to take Sidi Barrani on the Mediterranean coast, but the Italians had not been idle during their 3 months setting up camps – they had an estimated 75,000 men in the area with around 120 tanks and 200 big guns. In opposition the British had around 25,000 men and 275 light tanks. The plan was for part of the British troops to take advantage of a 20 mile wide gap in the Italian ring of fortified camps and move west where they would then be able to turn north and south to outflank the enemy. The attacking troops rehearsed these moves on 25th – 26th November 1940 although they didn’t know that the ‘training grounds’ marked out in the desert were exact replicas of their targets at Nibeiwa and Tummar. Orders came for a second exercise and it wasn’t until the troops arrived at the proposed site that they found this was no exercise but the jumping off point for a major Operation. On the night of 7th December the Western Desert Force advanced 70 miles west to their designated start line whilst the RAF attacked Italian airfields and dummy tanks were set up at strategic points to confuse the enemy.

aroured cars
Armoured cars in North Africa

The attack proper began at 5am on 9th December with British artillery firing on the Italian camp at Nibeiwa. By 8.30am the camp had fallen with over 800 Italian and Libyan soldiers dead, 1,300 wounded and 2,000 captured as well as large quantities of supplies being taken by the British forces who only had 56 casualties. With spirits high British troops moved on from Nibeiwa towards the camps at East and West Tummar. A huge sandstorm during the day slowed the British advance but as the weather cleared Indian and New Zealand forces pushed on with the attack just before 2pm. By 4pm most of the camp at Tummar West was in British hands with East Tummar falling by dark. As the Allies continued to push west enemy positions continued to fall like dominoes. The 2nd Libyan Division lost 26 officers and 1,327 men killed, 32 officers and 804 men wounded and all survivors being taken prisoner.

At Maktila the enemy were forced into sand dunes where they were overrun by British Cruiser tanks. The remaining Italians regrouped at Sidi Barrani where the British attacked in the late afternoon of 10th with the position falling by nightfall. Wavell’s forces continued to push west causing mass surrenders of the defending troops, so much so that the number of prisoners began to slow the advance of the British who were totally unprepared for such high numbers.

matildas
British ‘Matilda’ tanks

The shocked Italian army was in full retreat with the British harrying them every step of the way. By the time the Italians had been pushed out of Egypt on 15th December (less than a week into Operation Compass) 38,300 of their men had been taken prisoner and huge amounts of equipment had been abandoned including 237 pieces of artillery and 73 tanks while the British losses consisted of 133 killed, 387 wounded and 8 missing. The British halted for a time to bring up supplies and await Australian reinforcements before attacking the enemy at Bardia (on the Egyptian coast about half way between Sid Barrini and Tobruk) which was garrisoned by 45,000 men and over 400 guns and tanks; Bardia was also surrounded by 18 miles of double barbed wire fencing with a four foot anti-tank ditch, minefields and machine gun positions. Whilst forces were amassing the British continued to attack in other sectors – Sidi Omar was taken on 16th December in a battle which lasted just 10 minutes leaving 50 Italians dead and 900 taken prisoner!

Italian_soldiers_taken_prisoner_during_Operation_Compass
Italian and Libyan Prisoners Of War

With new supplies and a new year the British resumed the attack again on 3rd January 1941 after a night of heavy bombing and bombardment of Bardia. The 6th Australian Division had air and naval support as they began the attack, blowing gaps in the barbed wire and filling in the anti-tank ditches by hand. Once they had breached the outer defences other Australian forces pushed through the gap, broke through the secondary defences and cut the city in two. Bardia finally fell after 3 days of fighting. The Italian forces were in such disarray that the commander of one British tank found himself in charge of 1,500 Italian prisoners! In all more than 25,000 Italians were captured whilst the Australians lost 130 killed and 326 wounded. The disheartened Italians regrouped at Tobruk with its vital harbour and garrison of over 25,000 within the two rings of defences (the inner 19 miles long, the outer 30 miles). The British halted their push to bring up supplies and carry out maintenance on the tanks which had covered too many miles without any repair or replacement of tracks.

australian tanks
Australian tanks

The attack on Tobruk began at 5.40am on 21st January 1941 with the British advancing an impressive 1 mile during the first hour. The Italians put up a fierce fight but by early evening the British had taken half of the port with the help of air support from the RAF. Sensing inevitable defeat the Italians began to destroy the port before finally surrendering the following morning. Within 36 hours of the initial attack the British had taken 27,000 prisoners, 230 guns and 200 vehicles with the loss of only 400 men, 355 of whom were Australians. Although they had destroyed many stores the Italians had not had enough time to destroy all of the port facilities and the British were soon able to use it for their own re-supply. Two captured water distilleries also helped to reduce the problems of supply for the attacking army which continued to push steadily westward.

Australian troops at Tobruk
Men of the Australian 2nd/11th Battalion, 6th Division pictured during the Battle of Tobruk, 22 January 1941.

The Italian reserve forces were not ready for battle but feared that they might be surrounded by the British and so began a counter-attack on 23rd January. Their push was initially successful before they were caught against the skyline on the top of a ridge and their tanks destroyed. The Italians were now desperate and slowed the British advance with mines, booby-traps and ambushes, but the British still took Derna on 29th January before pursuing the enemy along the coast road as well as moving through the mountains in order to cut of their retreat from behind. The encircling forces arrived just 30 minutes before the fleeing Italians on the 5th February. The Italians attacked the next day and fought for over 24 hours, but with more British troops arriving to surround them they surrendered on 7th February with 25,000 taken prisoner and the loss of 107 tanks and 93 guns.

This surrender of the fleeing Italians marked the end of Operation Compass, a holding exercise originally planned to last for just five days but in which two Divisions (one new to the dessert and one short on tanks) decimated an army more than 10 times its size. Wavell was able to garrison Tobruk with the aim of continuing to push the Italians westwards and out of North Africa for good. Operation Compass was a massive victory for the British and it looked as though the whole of North Africa would soon be in their hands.

The British had yet to hear of Erwin Rommel and his Afrika Korps.

Some corner of a foreign field that is for ever England – cemeteries of the First World War

7a185080f8d2876c58cfd766d74f102e4796ccf5
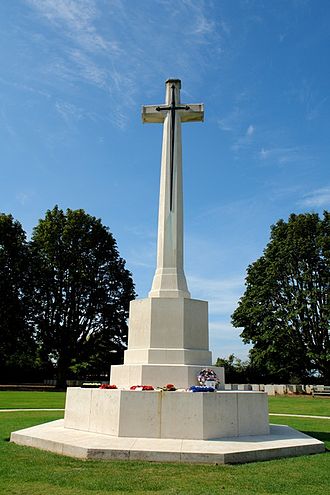
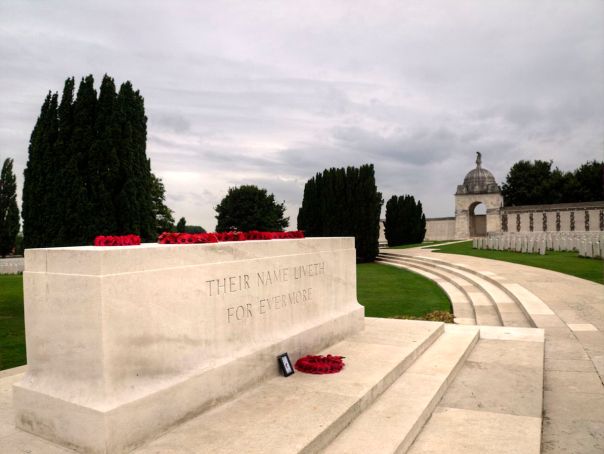
As we commemorate the ending of the First World War it is fitting that we remember all those who paid the ultimate price. We are all aware of cemeteries around the world which contain the graves of soldiers who died far from home, and if you have ever visited one you will have been impressed by the standard of care which is taken to keep these places of remembrance at their best. This work is carried out by The Commonwealth War Graves Commission (CWGC) which was the brainchild of Sir Fabian Ware. The CWGC builds and maintains cemeteries and memorials in more than 150 countries and territories and also creates and preserves archives with extensive records of the fallen. Ware was 45 when war broke out and so too old to fight but he was determined to play his part so became the commander of a mobile unit in the British Red Cross. Arriving in France in 1914 he was appalled and saddened at the huge loss of life he saw, and also by the fact that there was no official way of documenting and recording the graves. Determined that none of the fallen would be forgotten he organised for his unit to begin recording and caring for all the graves they could find. Municipal cemeteries were soon full and Ware negotiated for France to grant land in perpetuity to Britain which would become responsible for the management and maintenance of the graves there. People heard about Ware’s work and he began to get letters from people asking for photographs of the graves of their loved ones. By 1917 17,000 photos had been sent. At the same time graves were being recorded in Egypt, Greece and Mesopotamia as well as France.

1 Canadian_Corps_-_Canadian_war_graves
These soldiers were all members of the Canadian 14th Battalion, killed over several days in May 1916 and buried near the advanced dressing station

Many people were impressed with this work which was officially recognised by the War Office when the unit was incorporated into the British Army in 1915 and became known as the Graves Registration Commission. Ware wanted his Commission to show the same Imperial cooperation that could be seen in the armed forces so he approached the Imperial War Conference for their help and advice. With the support of the Prince of Wales the Imperial War Graves Commission was founded by Royal Charter on 21st May 1917; Ware was Vice-Chairman and the Prince of Wales was the first President.

NPG x85421; Sir Fabian Arthur Goulstone Ware by Bassano
Sir Fabian Ware

When the war ended in November 1918 land was found for the new cemeteries and memorials and the terrible task of recovering and re-interring the bodies of the dead began. Conscripted soldiers undertook this work which must have been very difficult and resulted in emotional and mental problems for many as they recovered thousands of bodies, some four or more years old. Using Ware’s existing records as a foundation around 587,000 graves had been identified by the end of 1918, and the register of those having no known grave had reached 559,000. It was decided that the bodies should not be repatriated but lie beside their brothers in arms, it was also decided that all of the graves would be identical so that men of all ranks would be treated equally.

The Commission were determined that the work they had undertaken would be carried out to the highest of standards and so they employed three of the most important architects of the time – Sir Edwin Lutyens, Sir Herbert Baker and Sir Reginald Blomfield – to design and build the memorials and cemeteries; Rudyard Kipling (who lost his son in the war) was asked to help with the inscriptions. The garden designer, Gertrude Jekyll, helped the architects to created a walled cemetery with a garden. This became the template for all other cemeteries which were ready to receive the dead by 1921, and between 1920 and 1923 4,000 headstones were being shipped to France every week. By 1927 the majority of the work had been completed with over 500 cemeteries built and over 400,000 headstones in place; in addition 1,000 ‘Crosses of Sacrifice’ designed by Blomfield and 400 ‘Stones of Remembrance’ designed by Lutyens were also in place.

5 cross of sacrifice
Cross of Sacrifice

When the war ended the British Army was responsible for the exhumation of remains, by September 1921 the 12-man teams had exhumed and reburied 204,695 bodies. No more searches were conducted after that, but bodies continued to be discovered (in the following 3 years alone the remains of another 38,000 soldiers were found). In the mid-1920’s 20 to 30 bodies were being discovered every week, and even today around 30 bodies are found every year.

Some of the latest bodies of First World War soldiers to be recovered include:

  • In 2006 eight bodies of Canadian soldiers from the 78th Battalion (Winnipeg Grenadiers), CEF were discovered in a backyard in Hallu, France.
  • The remains of four British soldiers discovered by a French farmer clearing land with a metal detector in 2009 were re-interred at H.A.C. Cemetery near Arras, France in April 2013.
  • In March 2014, the remains of 20 Commonwealth and 30 German soldiers were discovered at Vendin-le-Vieil, France. The Commonwealth soldiers were reburied at Loos British Cemetery.

When the remains of a Commonwealth soldier from the First or Second World War are discovered the Commission is notified, and a burial officer collects any artefacts found with the body which might help to identify the individual. The details of the find are then registered and archived at the Commission’s headquarters.

All of the cemeteries created and cared for by the Commission have a similar design. They are usually enclosed by a low hedge or wall with a wrought-iron entrance gate. Inside all but the very smallest of the cemeteries you will find a plan of the site and register of all the burials there, this is kept in a metal cupboard which can be accessed by anyone searching for a particular soldier. The cemeteries are laid to grass with no pathways, and each headstone has flowers planted beside it (except in very dry countries). The flowers are often native species which closely resemble flowers of England. If there are a lot of cemeteries in an area (e.g. along the Western Front or in Gallipoli) a team of local gardeners will care for them, in large cemeteries there will be a dedicated staff whilst small ones may just have one gardener who works part-time.

If a cemetery has more than 40 graves it will also have a Cross Of Remembrance designed by Reginald Blomfield, which is a free-standing cross (usually carved from limestone) with a bronze medieval longsword embedded in its face. The cross is intended to represent the faith of the majority of the dead whilst the sword is an expression of the Christian concept of self-sacrifice. The larger cemeteries (those with more than 1,000 burials) also have a Stone of Remembrance designed by Edwin Lutyens; this stone is inscribed with the words ‘Their Name Liveth For Evermore’. Unlike the Cross Of Remembrance, the Stone deliberately avoids reference to any particular religion.

6 Stone_of_Remembrance,_Tyne_Cot_Cemetery
Stone of Remembrance, Tyne Cot

Every grave is marked with a headstone which contains the national emblem or regimental badge, rank, name, unit, date of death and age of each casualty carved above an appropriate religious symbol, sometimes it will also have a more personal dedication chosen by relatives. If the cemetery is in an area which may be at risk of earthquakes a memorial plaque is placed at ground level rather than using a headstone which might fall. If the person who had died had been awarded wither the Victoria Cross or the George Cross and image of this will also be engraved on the headstone. There are, sadly, many graves where the casualty has not been able to be identified, in such cases the words ‘A Soldier of the Great War known unto God’ will be used in place of a name.

2 CWGC_-_Headstone_carving
Headstones were carved by hand and would need at least a week to complete

Unfortunately, the First World War did not prove to be ‘the war to end all wars’ and the Commission was called upon to continue its work during the Second World War and other conflicts which have followed. Winston Churchill recognised that civilians were paying an increasingly heavy price in war and so the Commission was given the task of recording the names of civilians who had died due to enemy action during the Second World War. The Civilian War Dead Roll of Honour is housed in Saint George’s Chapel in Westminster Abbey.
In 1960 the name of the Imperial War Graves Commission was changed to the Commonwealth War Graves Commission. The work of remembrance continues; in 2008 mass graves were discovered on the edge of Pheasant Wood near Fromelles. Two-hundred and fifty British and Australian bodies were recovered and re-interred in a new cemetery, the first to be opened in more than fifty years.

4 Fromelles Pheasant Wood
Pheasant Wood, Fromelles

Since its creation the CWGC has created 2,500 war cemeteries, but there are many fallen soldiers who have no known grave – there were 315,000 in France and Belgium alone – and their names are written on permanent memorials. Reginald Blomfield designed the Menin Gate which was the first of the large memorials to be completed and was unveiled on 24th July 1927. Despite its size there was not enough space to list all of the names as had been planned and so Herbert Baker designed Tyne Cot Memorial to the Missing which recorded a further 34,984 names. Other large memorial for those with no known grave are:

the Helles Memorial in Gallipoli

the Thiepval Memorial on the Somme

the Arras Memorial

Basra Memorial in Iraq

neuve-chapelle-indian-gj12_orig
Cemetery of Indian soldiers at Neuve-Chapelle

The Dominions and India also erected memorials on which they commemorated their missing:

the Neuve-Chapelle Memorial for the forces of India

the Vimy Memorial by Canada

the Villers-Bretonneux Memorial by Australia

the Delville Wood Memorial by South Africa

the Beaumont-Hamel Memorial by Newfoundland

So, as we commemorate the end of the First World War and all those who have given so much in service of their country let us take a few moments to pause and reflect on the sacrifices they have made.

The Soldier by Rupert Brooke 1887 – 1915

If I should die, think only this of me:
That there’s some corner of a foreign field
That is for ever England. There shall be
In that rich earth a richer dust concealed;
A dust whom England bore, shaped, made aware,
Gave, once, her flowers to love, her ways to roam,
A body of England’s, breathing English air,
Washed by the rivers, blest by suns of home.

And think, this heart, all evil shed away,
A pulse in the eternal mind, no less
Gives somewhere back the thoughts by England given;
Her sights and sounds; dreams happy as her day;
And laughter, learnt of friends; and gentleness,
In hearts at peace, under an English heaven.

3 menin-gate-cbart-vandenbroucke_tcm13-8856
The Menin Gate


Czech pilots of the RAF

In my last article I explained how the British Prime Minister, Neville Chamberlain, reached an agreement with Hitler in September 1938, an agreement which resulted in Germany annexing the Sudetenland and eventually taking over the whole of Czechoslovakia. There were many brave Czechs who wanted to fight against the Nazis but could not do so once their country had fallen; this article explains what happened to some of them.

In the weeks after Germany occupied Czechoslovakia thousands of soldiers and airmen managed to escape the county and joined the French Foreign Legion until the Second World War finally began in September 1939. Czech airmen then transferred to the Armée de l’Air and fought in the Battle of France. After the German Blitzkrieg and the rapid defeat of France around 4,000 Czech military personnel sailed to Britain and offered their services to the besieged island kingdom.

Blitzkrieg

On 2nd July 1940 Benes, the Czech Prime Minister in exile, asked the British Government to allow Czech airmen to help defend Britain; within a month a Czech fighter squadron and a Czech bomber squadron had been formed. The Czech pilots were an asset as they already had combat experience and nurtured a deep hatred of the Germans, whilst the British needed every pilot they could get to fight off the expected invasion by Hitler. By the end of August a second Czech fighter squadron was operating in the skies above south-east England. Many people are unaware that almost 20% of the pilots who fought in the Battle of Britain were not British. The foreign forces consisted of 147 Poles, 101 New Zealanders, 94 Canadians, 88 Czechoslovaks, 29 Belgians, 14 French, 10 Irish, 7 Americans, and 1 Palestinian. The Czech pilots soon gained a reputation for aggressive combat, no doubt fuelled by the loss of their homeland. One of these – Jacob Frantisek – was the third most successful pilot during the Battle of Britain with 17 ‘kills’, and was one of just a few ‘Triple Ace’ pilots (to qualify as an Ace you must have brought down 5 enemy planes). It is interesting to note that out of the top ten fighter pilots during the Battle of Britain (all whom shot down at least 14 enemy planes) 50% were not British and included one Czech, one Polish, one Australian and two New Zealanders.

The foreign squadrons had an impressive record against the Luftwaffe and Air Chief Marshal Sir Hugh Dowding, head of RAF Fighter Command, said that he was not sure that Britain would have won the aerial battle without them. In recognition of their contribution the foreign pilots were visited at their base by King George VI, whilst the Polish and Czech airmen and their exploits were a common feature in the media. One of these pilots was the aforementioned Josef Frantisek who has been credited with shooting down 17 enemy aircraft in September 1940 alone, and is considered to be one of the top ‘scorers’ of the entire war even though his career as a fighter pilot was short.

Jossef Frantisek

Frantisek was born just before the outbreak of the First World War with a spirit of adventure which led to him joining the Czechoslovak Air Force, and which made it hard for him to obey orders when the armed forces were told not to resist the German invasion in 1939. He fled to Poland and served with the air force there, flying low to drop hand grenades on the attacking Germans. When Poland was defeated three weeks later Josef fled to Romania where he was interned before escaping; he travelled through the Balkans until he eventually reached Syria where he embarked for France. Once there he flew against the Germans until France was defeated and he made his way to Britain where he joined the RAF, his fourth air force in little more than a year.

Frantisek was a bit of a ‘Lone Wolf’ who would break away from the rest of his squadron to fight alone, often flying incredibly close to the enemy before opening fire or pursuing them back across the English Channel, and this is what ensured his high number of kills. Many British pilots thought that he was reckless, but it may simply have been that Josef Frantisek felt that he had nothing to lose, he had watched the German war machine roll over Europe and believed that winning the battle in the skies over Britain was the last hope of defeating Hitler. In one of his own reports Frantisek described how swarms of Messerschmitt 109s attacked so he played hide and seek with them in the clouds, during the engagement he almost collided with a German bomber and then shot down two enemy planes in a few minutes before he was hit, he ended the sortie in a cabbage field north of Brighton where he said he ‘made an excellent landing’. Josef’s short but highly successful career with the RAF ended on 8th October 1940, the day after his 27th birthday, when he crash-landed in a field in Surrey; his plane flipped over and he died instantly. No one is quite sure what happened – whether it was a lack of fuel or perhaps just sheer exhaustion – but the Allies lost a truly great pilot that day. Not long after Frantisek’s death Hitler felt that his Luftwaffe could not gain control of the skies above Britain and his invasion was postponed.

Karel Kuttelwascher

With the Battle of Britain won the foreign pilots continued to fly with the RAF against the Germans. Another Czech hero was Karel Kuttelwascher who joined the Czechoslovak Air Force when he was 18 and had already done 2,200 flying hours before the Germans occupied Czechoslovakia. Three months after the invasion he escaped to Poland hidden in a coal train, then to France where he helped the fight against the Germans before escaping to Morocco where he got a ship to England and joined the RAF. He flew for two years with No. 1 Squadron in which time he shot down enemy planes and took part in attacks against the German battle cruisers ‘Scharnhorst’ and ‘Gneisenau’. From mid-1942 Kuttelwascher flew night intrusion missions in which he flew a long-range Hurricane over enemy bases to take out German bombers as they were taking off or landing, a time when they were low and slow so vulnerable to his cannon. His ‘Night Reaper’ plane was very successful as he destroyed 15 bombers and badly damaged 5 more in just three months. On one memorable sortie he shot down three Heinkel bombers in just four minutes; Kuttelwascher was so successful that he was awarded the Distinguished Flying Cross twice in just 42 days. The media idolised successful pilots like Kuttelwascher and they began to call him ‘The Czech Night Hawk’; with18 kills he was the top-scoring Czech pilot of the Second World War.

Josef Koukal

Czechoslovak airmen did not only serve as pilots, they were also involved in Transport Command, Ferry Command, photo reconnaissance, air-sea rescue, and in dropping agents into enemy territory, including their homeland. 480 Czechs paid the ultimate price and did not live to see the peace – 273 of these deaths came from the bomber crews of 311 Squadron which suffered incredible losses. There were 1,500 Czechs still serving in the RAF at the end of the war, but these heroes did not receive the welcome they deserved when they returned home.

The Communists took control of Czechoslovakia in February 1948, and it was the belief of the new authorities that anyone who had fought for the western allies was suspect, probably a traitor; many of the former pilots were arrested, and Karel Janoušek, who had been head of the RAF Czech Inspectorate during the war, was imprisoned for 15 years. Many other airmen were dismissed from the forces and all of them were victimised, their wartime heroics forgotten. One example of how these Czech heroes were treated is Josef Koukal who, like Frantisek and Kuttelwascher, had made his way to the RAF via the air forces of Czechoslovakia, Poland, and France. In September 1940 he was shot down over the Isle of Sheppey, and although he was thrown clear of his plane in an explosion his clothes caught fire and he suffered burns to 72% of his body. Over the next two years Koukal underwent 22 operations at ‘The Guinea Pig Club’, the specialist burns unit at The Queen Victoria Hospital. Despite his extensive burns and two pieces of shrapnel in his right eye (which remained there for the rest of his life) Koukal was determined to fly again, his doctors could not dissuade him and he resumed operational flying in May 1943. Koukal returned to his homeland after the war, but after the Communist takeover in 1948 he was persecuted by the State Security Police. Koukal refused to be provoked so they could not arrest him but he, his wife, and their two sons were restricted to living in a single room without running water or a toilet for the next 14 years. Koukal died of a heart attack in 1980 and it was not until November 1989, after the Czech ‘Velvet Revolution’, that he finally received recognition from his homeland for the part he played in fighting to free Czechoslovakia from Nazi German control. Koukal was ‘politically and morally rehabilitated’ by the new non-Communist regime and posthumously promoted to the rank of Colonel in the Czechoslovak Air Force; at the same time the other men who had flown with the RAF were finally officially recognised. Many had already died but those who still survived and were now in their 70’s and 80’s were overnight celebrities who were finally able to show their uniforms and medals with pride, and spent as much time as possible visiting schools and clubs so that their story could finally be told.

You can find out more about these brave Czech pilots on the Free Czechoslovak Air Force webpage

Josef Koukal